

Kubernetes become a quite stable technology over the years, and many companies adopt it and contribute to it. However managing traditional applications over different environments is not that easy.
Difficulty is a relative thing. The more your architecture grow, the more the complex it get. but even managing your applications over multiple environments is much more difficult. Fortunately, the container ecosystem has now evolved to that level of simplicity and introduce a popular tools for managing the complexity of kubernetes configuration called Helm. That will help you to reduce the complexity of managing a dozens of configuration files on a typical architecture (e.g microservices )
I’ve been working with Helm for awhile, and As I always believe that sharing is part of the learning journey. I decided to talk about one of many declarative applications managements that caught a lot of attention very early on and established itself as the market leader.
What’s HELM ?
Helm is package manager that provides GO based templating framework for the YAML (stands for Yet Another Markup Language) files.
Helm concept based on three key major concepts chart,release and repository as follow:
Chart : encapsulates each YAML definitions of the application and package it, so you can use it to deploy your application and even allows you to define metadata and documentation that might be useful when you share the package with your team.
Release : whenever you install a chart, a new release is created. A chart can have multiple release inside the cluster.
Repository : A chart repository is a simple HTTP server that store charts.
Helm helps you to :
- Share with your team your packaged chart
- Manage release of Helm package along side your application
- Customize/Use many stable chart
- Packaging charts into chart repository
- the templating system provides flow structure like loops and if statements which helps you to manage your kubernetes object definitions intelligently.
- Managing deployment over environments by substituting different values
- performing upgrade and rollbacks in a easy way
To facilitate coordination with the k8s cluster, Helm use two main components Helm Client and Tiller Server
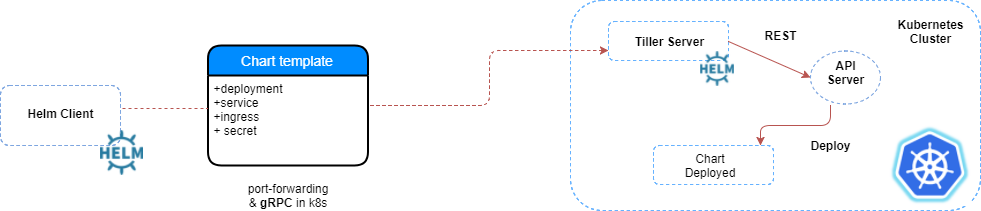
Helm Client: Is a CLI for end users that facilitates local chart development,repository management, also use gRPC to connect to tiller to install,upgrade or uninstall Charts.
Tiller Server: run inside the k8s cluster. Interacts with Helm Client and k8s Apiserveris, tiller is mainly Responsable for:
- receiving incoming requests from client.
- Combines a chart and it’s configuration to build a release
- Installing charts into Kubernetes and tracking the subsequent release
- Upgrading and uninstalling charts using k8s primitives and API
NOTE: There are two modes to install tiller server. Either inside the k8s cluster as mentioned above which means that tiller will be running on kube-system namespace with cluster-admin privilege ( see https://github.com/helm/helm/blob/master/docs/rbac.md#example-service-account-with-cluster-admin-role), or deploy tiller per namespace with strict privilege (see https://github.com/helm/helm/blob/master/docs/rbac.md#example-deploy-tiller-in-a-namespace-restricted-to-deploying-resources-only-in-that-namespace )
Hands-on HELM Charts
Assuming that you have a running k8s cluster, and you have installed the recent release of helm ( see Helm official documentation https://helm.sh/docs/using_helm/#installing-helm ).
There are different ways to install a chart, either use stable charts from the public repository (e.g hub.kubeapps.com) or create you own chart.
First step onto Helm charts
Helm Client interacts by default with the stable chart of the official kubernetes charts repository, that contains well-tested and well-maintained charts.
You can list all the stable charts by running the following command:
(⎈ |kubernetes-admin@kubernetes:default)$ helm search
NAME                                    CHART VERSION   APP VERSION   DESCRIPTION
stable/acs-engine-autoscaler         2.2.2           2.1.1              DEPRECATED Scales worker nodes within agent pools
stable/aerospike                             0.2.3           v4.5.0.5          A Helm chart for Aerospike in Kubernetes
stable/airflow                                 2.4.4           1.10.0             Airflow is a platform to programmatically author, schedul...
stable/ambassador                         2.1.0           0.53.1             A Helm chart for Datawire Ambassador
stable/anchore-engine                   0.12.1          0.3.3              Anchore container analysis and policy evaluation engine s...
stable/apm-server                          1.0.0           6.6.2                           The server receives data from the Elastic APM agents and ...
stable/ark                                       4.2.1           0.10.2                          A Helm chart for ark
stable/artifactory                            7.3.1           6.1.0                           DEPRECATED Universal Repository Manager supporting all ma...
stable/artifactory-ha                      0.4.1           6.2.0                           DEPRECATED Universal Repository Manager supporting all ma...
stable/atlantis                                2.0.1           v0.6.0                          A Helm chart for Atlantis https://www.runatlantis.io
stable/auditbeat                             1.1.0           6.7.0                           A lightweight shipper to audit the activities of users an...
stable/aws-cluster-autoscaler        0.3.3                                           Scales worker nodes within autoscaling groups.
stable/aws-iam-authenticator        0.1.0           1.0                             A Helm chart for aws-iam-authenticator
stable/bitcoind                               0.1.6           0.17.1                          Bitcoin is an innovative payment network and a new kind o...
stable/bookstack                            1.1.0           0.25.2                          BookStack is a simple, self-hosted, easy-to-use platform ...
stable/buildkite                              0.2.4           3                               DEPRECATED Agent for Buildkite
stable/burrow                                1.1.5           0.25.0                          Burrow is a permissionable smart contract machine
stable/centrifugo                           3.1.0           2.1.0                           Centrifugo is a real-time messaging server.
stable/cerebro                               0.5.3           0.8.2                           A Helm chart for Cerebro - a web admin tool that replaces...
stable/cert-manager                     v0.6.7          v0.6.2                          A Helm chart for cert-manager
...
To find more informations about a particular chart, you can run the command :
helm inspect <keyword>
Here is an example of redis chart contents :
(⎈ |kubernetes-admin@kubernetes:default)$ helm inspect stable/redis
apiVersion: v1
appVersion: 4.0.14
description: Open source, advanced key-value store. It is often referred to as a data
  structure server since keys can contain strings, hashes, lists, sets and sorted
  sets.
engine: gotpl
home: http://redis.io/
icon: https://bitnami.com/assets/stacks/redis/img/redis-stack-220x234.png
keywords:
- redis
- keyvalue
- database
maintainers:
- email: containers@bitnami.com
  name: Bitnami
- email: cedric@desaintmartin.fr
  name: desaintmartin
name: redis
sources:
- https://github.com/bitnami/bitnami-docker-redis
version: 6.4.4

---
## Global Docker image parameters
## Please, note that this will override the image parameters, including dependencies, configured to use the global value
## Current available global Docker image parameters: imageRegistry and imagePullSecrets
##
# global:
#   imageRegistry: myRegistryName
#   imagePullSecrets:
#     - myRegistryKeySecretName

## Bitnami Redis image version
## ref: https://hub.docker.com/r/bitnami/redis/tags/
##
image:
  registry: docker.io
  repository: bitnami/redis
...
You can also customize chart configuration options before installing by running helm inspect values <keyword>. For instance the output of redis chart :
(⎈ |kubernetes-admin@kubernetes:default)$ helm inspect values stable/redis
## Global Docker image parameters
## Please, note that this will override the image parameters, including dependencies, configured to use the global value
## Current available global Docker image parameters: imageRegistry and imagePullSecrets
##
# global:
#   imageRegistry: myRegistryName
#   imagePullSecrets:
#     - myRegistryKeySecretName

## Bitnami Redis image version
## ref: https://hub.docker.com/r/bitnami/redis/tags/
##
image:
  registry: docker.io
  repository: bitnami/redis
  ## Bitnami Redis image tag
  ## ref: https://github.com/bitnami/bitnami-docker-redis#supported-tags-and-respective-dockerfile-links
  ##
  tag: 4.0.14
  ## Specify a imagePullPolicy
  ## Defaults to 'Always' if image tag is 'latest', else set to 'IfNotPresent'
  ## ref: http://kubernetes.io/docs/user-guide/images/#pre-pulling-images
  ##
  pullPolicy: Always
  ## Optionally specify an array of imagePullSecrets.
  ## Secrets must be manually created in the namespace.
  ## ref: https://kubernetes.io/docs/tasks/configure-pod-container/pull-image-private-registry/
  ##
  # pullSecrets:
  #   - myRegistryKeySecretName
...
You can override any of these settings and pass it during the installation as follow :
cat custome-values.yaml
password: metanext
master:
  persistence:
    enabled: false
  resources:
    Memory: 200Mi
    CPU: 100m
(⎈ |kubernetes-admin@kubernetes:default)$ helm install -f custome-values.yaml stable/redis --name db
NAME:   db
LAST DEPLOYED: Sun Apr 14 19:41:58 2019
NAMESPACE: default
STATUS: DEPLOYED

RESOURCES:
==> v1/ConfigMap
NAME                    DATA  AGE
db-redis         3     0s
db-redis-health  3     0s

==> v1/Pod(related)
NAME                                   READY  STATUS             RESTARTS  AGE
db-redis-master-0               0/1    ContainerCreating  0         0s
db-redis-slave-89b48b96f-cxvj9  0/1    ContainerCreating  0         0s

==> v1/Secret
NAME             TYPE    DATA  AGE
db-redis  Opaque  1     0s

==> v1/Service
NAME                    TYPE       CLUSTER-IP      EXTERNAL-IP  PORT(S)   AGE
db-redis-master  ClusterIP  10.102.187.121  <none>       6379/TCP  0s
db-redis-slave   ClusterIP  10.111.162.243  <none>       6379/TCP  0s

==> v1beta1/Deployment
NAME                   READY  UP-TO-DATE  AVAILABLE  AGE
db-redis-slave  0/1    1           0          0s

==> v1beta2/StatefulSet
NAME                    READY  AGE
db-redis-master  0/1    0s
The above command will override the redis values, but accepts the rest of the defaults for the chart. There are two ways to override configuration options during installation (see https://helm.sh/docs/using_helm/#customizing-the-chart-before-installing, if you want to use your own release name, simply use the –name flag on helm install). Besides Helm Client print useful informations during the installation about which resources were created, and the state of the release as shown above.
NOTE:To find a full list of configurable parameters of the redis chart you can refer to the official chart documentation in the chart repository on Github (https://github.com/helm/charts/tree/master/stable/redis).
Furthermore, to keep track of this deployed release, you can use helm status <keyword> as shown below :
(⎈ |kubernetes-admin@kubernetes:default)$ helm status db
LAST DEPLOYED: Sun Apr 14 19:41:58 2019
NAMESPACE: default
STATUS: DEPLOYED

RESOURCES:
==> v1/ConfigMap
NAME                    DATA  AGE
db-redis         3     72s
db-redis-health  3     72s

==> v1/Pod(related)
NAME                                   READY  STATUS   RESTARTS  AGE
db-redis-master-0               1/1    Running  0         72s
db-redis-slave-89b48b96f-cxvj9  1/1    Running  0         72s

==> v1/Secret
NAME             TYPE    DATA  AGE
db-redis  Opaque  1     72s

==> v1/Service
NAME                    TYPE       CLUSTER-IP      EXTERNAL-IP  PORT(S)   AGE
db-redis-master  ClusterIP  10.102.187.121  <none>       6379/TCP  72s
db-redis-slave   ClusterIP  10.111.162.243  <none>       6379/TCP  72s

==> v1beta1/Deployment
NAME                   READY  UP-TO-DATE  AVAILABLE  AGE
db-redis-slave  1/1    1           1          72s

==> v1beta2/StatefulSet
NAME                    READY  AGE
db-redis-master  1/1    72s
Connecting to database with following commands :
export REDIS_PASSWORD=$(kubectl get secret db-redis -o jsonpath="{.data.redis-password}" | base64 --decode)
kubectl port-forward  svc/db-redis-master 6379:6379 & redis-cli -h 127.0.0.1 -p 6379 -a $REDIS_PASSWORD
Build Your Own Chart from the ground up
Your First Template:
Practice makes you stronger. the best way to understand and master Helm is by creating your own chart, using the command as follow : helm create metanext
Helm Client will create a new directory in your project called metanext with the structure shown below :
metanext/
 |
 |- .helmignore # patterns to ignore when packaging Helm charts.
 |
 |- Chart.yaml # information about the chart
 |
 |- values.yaml # default values for templates files
 |
 |- charts/ # other charts the current chart depends on
 |
 |- templates/ # A chart template is the piece of the puzzle. you can define variables of YAML definitions of your services,Deployments and other kubernetes objects, those variables are called values.
 |   |- NOTES.txt # Installation notes and helpful informations that will be displayed for your users
 |   |- _helpers.tp # A place to put template helpers that you can re-use throughout the chart
 |   |- deployment.yaml # k8s object
 |   |- ingress.yaml  # k8s object
 |   |- service.yaml  # k8s object
Helm is a convenient templating engine, it uses the Go templating engine. to customize kubernetes YAML definitions before submitting them to the cluster. Let’s look to the service.yaml to see what this looks like :
apiVersion: v1
kind: Service
metadata:
  name: {{ include "app.fullname" . }}
  labels:
    app.kubernetes.io/name: {{ include "app.name" . }}
    helm.sh/chart: {{ include "app.chart" . }}
    app.kubernetes.io/instance: {{ .Release.Name }}
    app.kubernetes.io/managed-by: {{ .Release.Service }}
spec:
  type: {{ .Values.service.type }}
  ports:
    - port: {{ .Values.service.port }}
      targetPort: http
      protocol: TCP
      name: http
  selector:
    app.kubernetes.io/name: {{ include "app.name" . }}
    app.kubernetes.io/instance: {{ .Release.Name }}
All the varibales that can change are enclosed in {{ and }} blocks. you probably start asking yourself what all this keywords mean ?
Objects are passed into a template from the template engine. So for the example above:
.Values used to provides access to values passed into the chart. The defaults for this objects are defined in the values.yaml file( see https://github.com/helm/helm/blob/master/docs/chart_template_guide/values_files.md)
.Release describe the release itself (see https://github.com/helm/helm/blob/master/docs/chart_template_guide/builtin_objects.md)
.Chart provide metadata about the chart to your YAML definitions such as the name, or version (see https://github.com/helm/helm/blob/master/docs/charts.md#the-chartyaml-file)
include is a function among many functions provided by Helm that allows you to include one template in another. ( see https://github.com/helm/helm/blob/master/docs/charts_tips_and_tricks.md#using-the-include-function )
The leading dot before objects indicates that we start with the top-most namespace for this scope.
Checking the results:
Fortunately, Helm offers two different way to check if your templates work as intended once you finished your templates by running the following commands:
helm lint Run a series of tests to verify that your chart is well-formed, emitting errors for issues which will make installing the chart fail.
helm install <keyword> --dry-run --debug Gives you the ability to check the generated manifests of a release without installing the chart.
Demo time
For this demo, we are going to deploy a simple hello metanext using Helm chart on a staging environment.
I create a chart called metanext and I prepared all templates (see the code above).
Let’s looks what does it looks like a chart.yaml
(⎈ |kubernetes-admin@kubernetes:default)$ cat metanext/Chart.yaml
apiVersion: v1
appVersion: "0.0.1"
description: A Helm chart for Metanext Labs
name: metanext
version: 0.0.1
Version field where I specify the version of the chart
Appversion field where I specify the version of the chart
Also I declared the values that corresponds to my staging environment as shown below :
(⎈ |kubernetes-admin@kubernetes:default)$ cat values.yaml
environment:
  type: staging

microservice:
   name: hello-app
   replicasCount: 1
   repository: myazrou/hello-img
   tag: v0.0.1
   pullPolicy: IfNotPresent


healthcheck:
   path: /

ports:
  name: http
  containerPort: 8080
  protocol: TCP


service:
  type: NodePort
  port: 8080

resources:
   limits:
     cpu: 80m
     memory: 100Mi
   requests:
     cpu: 80m
     memory: 100Mi
Before starting the deployment part, we need to check if the chart does not contains any errors and the templates are well-formed.
(⎈ |kubernetes-admin@kubernetes:default)$ helm lint metanext/
==> Linting metanext/
[INFO] Chart.yaml: icon is recommended

1 chart(s) linted, no failures
Before upload the chart to kubernetes cluster, let’s simulate an install of the chart and enable debug mode to inspect the generated definitions as follow :
(⎈ |kubernetes-admin@kubernetes:default)$ helm install metanext/ --dry-run --debug --name metanext-lab
[debug] Created tunnel using local port: '39949'

[debug] SERVER: "127.0.0.1:39949"

[debug] Original chart version: ""
[debug] CHART PATH: /home/sysops/Labs/metanext

NAME:   metanext-lab
REVISION: 1
RELEASED: Tue Apr 16 04:00:07 2019
CHART: metanext-0.0.1
USER-SUPPLIED VALUES:
{}

COMPUTED VALUES:
environment:
  type: staging
healthcheck:
  path: /
microservice:
  name: hello-app
  pullPolicy: IfNotPresent
  replicasCount: 1
  repository: myazrou/hello-img
  tag: v0.0.1
ports:
  containerPort: 8080
  name: http
  protocol: TCP
resources:
  limits:
    cpu: 80m
    memory: 100Mi
  requests:
    cpu: 80m
    memory: 100Mi
service:
  port: 8080
  type: NodePort

HOOKS:
MANIFEST:

---
# Source: metanext/templates/service.yaml
apiVersion: v1
kind: Service
metadata:
  name: hello-app-svc
  labels:
    component: hello-app
    environment: staging
spec:
  type: NodePort
  ports:
  - targetPort: 8080
    name: http
    port: 8080
  selector:
     component: hello-app
---
# Source: metanext/templates/deployment.yaml
apiVersion: apps/v1
kind: Deployment
metadata:
  name: hello-app
  labels:
    component: hello-app
    environment: staging
    version: "v0.0.1"
spec:
  replicas:
  selector:
    matchLabels:
       component: hello-app
  template:
    metadata:
      labels:
        component: hello-app
    spec:
      containers:
        - name: hello-app-img
          image: "myazrou/hello-img:v0.0.1"
          imagePullPolicy: IfNotPresent
          ports:
          - name: http
            containerPort: 8080
            protocol: TCP
          env:
          - name: PORT
            value: "8080"
          resources:
            limits:
              cpu: 80m
              memory: 100Mi
            requests:
              cpu: 80m
              memory: 100Mi

          readinessProbe:
            httpGet:
              path: /
              port: 8080
            initialDelaySeconds: 30
            periodSeconds: 10
            failureThreshold: 6
          livenessProbe:
            httpGet:
              path: /
              port: 8080
            initialDelaySeconds: 35
            periodSeconds: 15
            failureThreshold: 6
Now everything looks good. So let’s deploy it.
(⎈ |kubernetes-admin@kubernetes:default)$ helm install metanext/  --name metanext-lab
NAME:   metanext-lab
LAST DEPLOYED: Tue Apr 16 04:02:15 2019
NAMESPACE: default
STATUS: DEPLOYED

RESOURCES:
==> v1/Deployment
NAME       READY  UP-TO-DATE  AVAILABLE  AGE
hello-app  0/1    1           0          <invalid>

==> v1/Pod(related)
NAME                        READY  STATUS             RESTARTS  AGE
hello-app-6b45fcf789-6q7f2  0/1    ContainerCreating  0         <invalid>

==> v1/Service
NAME           TYPE      CLUSTER-IP   EXTERNAL-IP  PORT(S)         AGE
hello-app-svc  NodePort  10.104.8.34  <none>       8080:32103/TCP  <invalid>


NOTES:

You have install hello-app, On staging Environment with success.

Your release is named metanext-lab, with version 0.0.1.

To learn more about the release, try:

  $ helm status metanext-lab
  $ helm get metanext-lab
 To visite your application, run the following commands :

 export NODE_PORT=$(kubectl get --namespace default -o jsonpath="{.spec.ports[0].nodePort}" services hello-app-svc)
 export NODE_IP=$(kubectl get nodes --namespace default -o jsonpath="{.items[0].status.addresses[0].address}")

 then, from your browser http://$NODE_IP:$NODE_PORT

Enjoy It
Our chart successfully deployed and Helm print helpful informations on Notes.
Let’s verify the status of the chart by running the following commands :
(⎈ |kubernetes-admin@kubernetes:default)$ helm status  metanext-lab
LAST DEPLOYED: Tue Apr 16 04:02:15 2019
NAMESPACE: default
STATUS: DEPLOYED

RESOURCES:
==> v1/Deployment
NAME       READY  UP-TO-DATE  AVAILABLE  AGE
hello-app  1/1    1           1          2s

==> v1/Pod(related)
NAME                        READY  STATUS   RESTARTS  AGE
hello-app-6b45fcf789-6q7f2  1/1    Running  0         2s

==> v1/Service
NAME           TYPE      CLUSTER-IP   EXTERNAL-IP  PORT(S)         AGE
hello-app-svc  NodePort  10.104.8.34  <none>       8080:32103/TCP  2s


NOTES:

You have install hello-app, On staging Environment with success.

Your release is named metanext-lab, with version 0.0.1.

To learn more about the release, try:

  $ helm status metanext-lab
  $ helm get metanext-lab
 To visite your application, run the following commands :

 export NODE_PORT=$(kubectl get --namespace default -o jsonpath="{.spec.ports[0].nodePort}" services hello-app-svc)
 export NODE_IP=$(kubectl get nodes --namespace default -o jsonpath="{.items[0].status.addresses[0].address}")

 then, from your browser http://$NODE_IP:$NODE_PORT

Enjoy It

(⎈ |kubernetes-admin@kubernetes:default)$ helm list
NAME            REVISION        UPDATED                         STATUS          CHART           APP VERSION     NAMESPACE
metanext-lab    1               Tue Apr 16 04:02:15 2019        DEPLOYED        metanext-0.0.1  0.0.1           default
All that remains is to follow the instructions of NOTES to access the application.
(⎈ |kubernetes-admin@kubernetes:default)$ export NODE_PORT=$(kubectl get --namespace default -o jsonpath="{.spec.ports[0].nodePort}" services hello-app-svc)
(⎈ |kubernetes-admin@kubernetes:default)$ export NODE_IP=$(kubectl get nodes --namespace default -o jsonpath="{.items[0].status.addresses[0].address}")
(⎈ |kubernetes-admin@kubernetes:default)$ curl http://$NODE_IP:$NODE_PORT
Hello, Metanext! Welcome to Hands-On Helm Charts
That’s all folks for this introduction. Next tutorial we’ll see more interesting use-cases about helm.
Useful links: